...who says it has to be chocolate, when it comes to easter sweets.
me being a big
time chocolate lover, not being able to resist any chocolate temptation,
thought i should go for an alternative this easter...but...i admit it
is not an alternative it is an addition.
...just in case you are expecting a recipe for jelly babies or gummi bears...sorry...there won't be any coming up here.
not that i
haven't tried making them before...not that they haven't turned out
quite well...but...the entire process is way to time and money consuming
to do it again.
...so...i rather
come up with this inexpensive and quick way of getting your jelly beans
and gummi bears in a perfect easter shape.


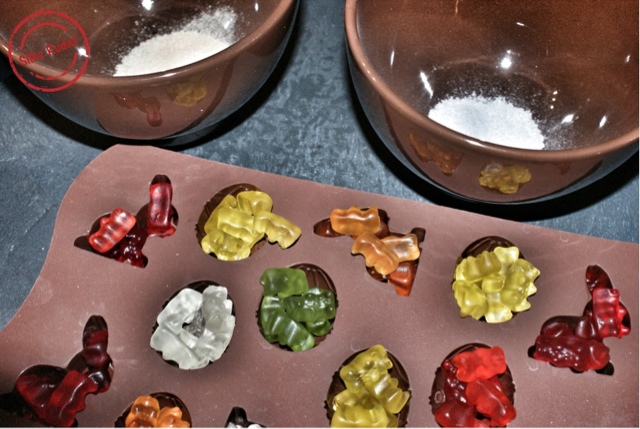
this is what you need
- silicone bunny and egg shaped moulds
- gummi bears
- sherbet powder
- bowl
- oven
this is what you have to do
- pour sherbet powder into the bowl
- put your gummi bears into the silicone moulds
- fill up the moulds totally and press the gummi bears firmly into the moulds
- place the moulds into the oven and let the jellies melt approximately 15 minutes at 210 degrees fahrenheit
- let everything cool down totally
- remove jelly easter bunnies and eggs
- dip the jellies into the sherbet powder bowl
- turn the jellies around, so they are totally covered with the powder
...this prevents the jolly jelly easter bunnies from sticking together
- enjoy
...today was one of those days, you should better not have left the house...cold, snowy, without turning the city in a beautiful white winter wonderland and no sunshine in sight.
don't get me wrong...i love this weather...even though, i might be the only one...and even though it is middle of march and everyone being tired waiting to see winter disappear.
...why not looking on the bright side of winter and make the best of it...recalling what we appreciate about winter time and go for it.
staying at home...getting cosy...enjoying a beautiful hot drink...
do you like hot chocolate...???
do you like white chocolate...???
do you like licorice...???
...you might like my hot white chocolate licorice sticks.

this what you need
- white chocolate
- grounded vanilla
- grounded aniseed
- licorice sprinkles
- silikcone moulds
- lollipop sticks
- milk
this is what you have to do
- melt white chocolate in a double boiler
- add vanille powder, aniseed powder, and licorice sprinkles and stir thoroughly
- pour into the silicone moulds
- let cool down before immersing the lollipop sticks
- let everything rest in the freezer for a few hours
- remove carefully
- dip the white chocolate stick in a glass of hot milk and stir until dissolved
- enjoy and forget the weather outside
...a beautiful candy jar is one of those things you can use in so many ways...of course to stow and display candies and other sweets...as a jewellery holder...as a cotton buds stowage...to brighten up any buffet...and...and...and.
and yes...there are so many different kinds of candy jars or bowls available to purchase.
...but why not making a unique candy jar yourself.
and guess what...you can find everything you need in a thrift store or dollar shop...this is what i did and i would like to share with you how.

this is what you need

- candlestick
- glass bowl
- small stainless steel plate
- foot of plastic champagne flutes (two for each candy jar)
- christmas tree topper or small christmas tree ornaments
- glue (better not a hot glue gun, i actually melted the plastic parts)
- saw
this is what you have to do
- cut off the very top of the tree topper, using a saw
- affix the topper on top of the foot of the plastic champagne flute with glue
- glue the foot onto the centre of the small stainless steel plate to create the lid of the jar
- adhere another champagne flute foot to the bottom of the glass bowl
- put the bowl into the candlestick, optional you can glue it too
- add the lid
- and enjoy your new amazing candy jar
...the minute i saw it...this shabby, wonky, plain and pale towel rack...i knew excatly what i wanted to do with it...a potato,- onion-, garlic storage matching my kitchen interior.
now, after all the sanding, painting and decorating...i am really in love with it.
this is what you need
- wooden towel rack
- wood stain
- brush
- sandpaper
- zinc buckets
- shovels and serving spoons
- hooks

this is what you have to do
- unscrew and dismantle the towel rack

- sand all parts

- apply wood stain and remove excess paint with the brush to ensure an even finish

- assemble the rack
- decorate it
- enjoy it