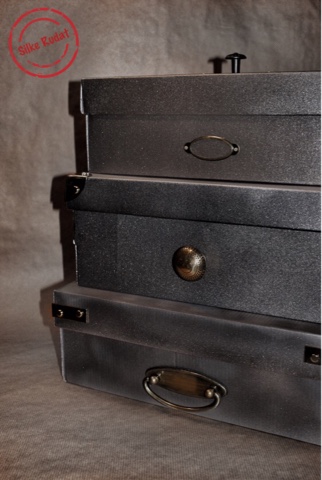
shoe boxes are are just beautiful little things...first the contain the real treasures...beautiful shoes...and then they can turned into beautiful storages to keep other treasures in place.
these treasure boxes look great in any places around the house and can be easily adjusted to match the colour and style of every room.
...they can also be used as a fancy and sustainable gift wrapping alternative.
as you can see... i gathered nearly all of my supply from hardware stores...again...but i am sure a lot of more filigran supply could be found in craft stores.
luckily i just bought a couple of ankle boots and now a new batch of shoe boxes are on hand for some more treasure boxes or suitcases to come.
http://silkerudat.blogspot.de/2013/06/vintage-suitcase-boxes.html
these treasure boxes look great in any places around the house and can be easily adjusted to match the colour and style of every room.
...they can also be used as a fancy and sustainable gift wrapping alternative.
as you can see... i gathered nearly all of my supply from hardware stores...again...but i am sure a lot of more filigran supply could be found in craft stores.
luckily i just bought a couple of ankle boots and now a new batch of shoe boxes are on hand for some more treasure boxes or suitcases to come.
http://silkerudat.blogspot.de/2013/06/vintage-suitcase-boxes.html


this is what you need

- shoe boxes
- spray paint
- screwdriver
- brass door knobs
- brass drawer handles
- brass screws
- brass trunk corners
- twist gimlet
- brass fastener
- brass frame
- brass corner brasses
this is what you could do with the first shoe box

- spray paint the first shoe box

- get the twist gimlet, the brass frame, one of the door knobs and brass screws ready

- place the bottom piece of the door knob onto the cover of the shoe box

- mark the point where the screw needs to be placed

- pierce a hole with the twist gimlet

- three holes were needed in my case

- attach the door knob

- get the brass frame and two more screws ready

- place the brass frame onto the front of the shoe box

- mark the holes

- pierce the holes


- attach the frame

- the first shoe box is turned into a beautiful storage

this is what you could do with a second shoe box


- you would need brass fastener, a drawer handle, screws, screw driver, twist gimlet and corner braces

- place one corner brace on each front corner of the lid of the shoe box

- to ensure a proper closing of the box, use brass fastener instead of screws

- attach a drawer handle to the front of the shoe box
this is what you could do with a third shoe box


- you would need two trunk corners, brass fasteners, a door knob, twist gimlet, screw driver

- place one trunk corners on each of the front corners
- to ensure a proper closing of the box, use brass fastener instead of screws

- attach the door knob to the front of the shoe box


i hope you have enjoyed the idea of the shoe box make over and the tutorial...thank you very much for stopping by...best regards...silke